Miami J® Cervical Collar
The collar will maintain your neck in the proper position while it is healing. Not being able to turn or shake your head “yes” or “no” may seem unusual, but limiting the motion of your neck is an important part of your treatment.
C-SPINE PRECAUTIONS:
You must be lying flat to remove the collar unless your doctor gives you permission to do this in a sitting position. You will need a second person to help you in order to maintain the proper head, neck, and airway alignment.
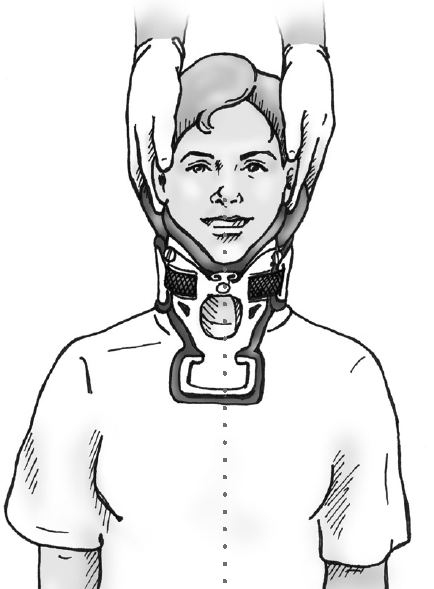
Position patient with arms to the side, shoulders down and head aligned centrally. Unless otherwise specified by your doctor: Do not remove the collar except to wash under it and change the pads.
COLLAR REMOVAL & SKIN CARE
Keeping your Miami J® and the skin beneath clean is an important part of your treatment. Daily cleaning will help to prevent skin irritation. Cleaning the collar will require at least one set of replacement pads.
When you are at home you should shower or bathe with the collar on. After you wash you will need to take the collar off to wash your neck and change the pads.
Before removing the collar, note where the ends of the velcro straps are. When you put the collar back on, the straps should be in the same position. You may use a pen or marker to mark the positions on the white plastic shell.
To wash under collar and change pads while lying down:
- Lie flat in bed without a pillow. Keep your head in a neutral position. Do not bend your neck forward, backward or from side to side.
ALTERNATIVE POSITION
To wash under collar and change pads while sitting:
- You must have permission from your doctor to do this.
- Sit up straight in a firm chair in front of a mirror.
-
Keep your head and neck in a neutral position (nose inline with belly button,chin level).
-
Do not bend you neck forward, backward or side ways.
Be very careful not to move your neck while this is done.
- Undo the Velcro straps. Remove the Back of the collar, sliding out from under neck if necessary.
2. Remove the Front. If present, unfasten the elastic Assist Strap that goes around the back of the neck.
3. Wash front and back of the neck with mild facial soap and water. Completely dry the skin. Observe for any redness or irritation under the collar, especially over bony areas like the chin, clavicle, or back of the head.
- Patient laying down: Back of the head will be checked and cleaned at a later step.
- Wearing a beard may cause skin irritation in men.
- Redness on chin may indicate improper use of a pillow. If permitted, pillows must always be placed behind the head and shoulders
Cleaning the Front and Back of collar
- Peel the soiled, blue pads off. Look carefully at the shapes as you remove them so that you can reposition the clean pads properly. The pads attach with velcro.
- Was the pads with mild facial soap and water in the sink.
- DO NOT use bleach or harsh detergents.
- Rinse well with clean water.
- Wring out the extra water and squeeze n a towel.
- Lay the pads flat to air dry. It should take less than 1 hour to dry.
- Wipe the plastic collar shell clean with mild soap and water.
- Attach the replacement pads. Fold the pads in half with the dull side out next to the velcro (the shiny side goes against the skin); then center the pad in the white shell.

Adjust the pads as needed to make sure no plastic touches the skin.
Replace Collar
- Patient laying down: Slide the Back carefully behind the patient's neck. Make sure it is centered evenly. Long hair should be placed outside the collar.
-
Flare the sides of the Front out, slide it up the chest wall and scoop it up! under the chin.
- Sides of the collar Front should be directed up toward the patient´s ears.
- Patient Sitting: Bring the Assist Strap around the back of the neck and attach the white section loosely to the opposite side of the collar.
-
Place the Back behind the patient´s neck. Make sure it is centered evenly. Attach the Back straps loosely to the Front.
-

- SNUG IT UP!
- While holding the Front securely, curl the ends snugly against the patient’s neck. Fasten the velcro strap, then secure the other side in the same way. Alternately tighten the straps, one at a time, until they are in the original position.The velcro straps must be aligned symmetrically and oriented “blue-on-blue” to the velcro on the Front.
-
- If the patient can slip his/her chin inside the collar, it is a clear indication collar is not snug enough.
- Patient laying down: After the collar is in place, gently roll the patient onto his/her side. (Place a small pillow or folded towel under his/her cheek to prevent the head from tilting sideways.)
-
Undo the velcro strap on the top side of the collar and fold the Back down to clean and check the back of the patient’s head for redness or irritation.
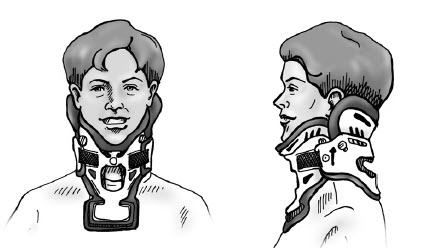
FINAL CHECKLIST:
A properly applied Miami J® will look like the above illustrations:
- Chin is centered comfortably in the chin piece.
- Collar velcro straps oriented blue-on-blue, both tabs the same length.
- Front of collar angled up toward ears. The lower plastic edge should not be resting on clavicles or digging into shoulder.
- Sides of the Back overlap the sides of the Front.
- No plastic touching the skin. Blue SorbatexTM pads extend beyond all plastic edges.
- No slack or gaps in any of the straps (except Assist Strap).
- The large front and back openings are centered on the neck.